How to Screen Record on Mac

To screen record on Mac, press ⌘ Shift 5, choose the entire screen, a window or a portion, then click Record. Sound isn't set up for you, so this guide shows how to add it, trim the video and send it without a huge file.

Updated October 29, 2026 · Verified on macOS 27 · 9 min read

Key takeaways

  • ⌘ Shift 5 opens the screenshot toolbar. The three buttons on the right record the entire screen, one window or a portion of it.
  • To stop, click the stop button in the menu bar or press ⌘ Control Esc. The video lands on your desktop as a .mov file.
  • Out of the box, the video is silent. In Options, check Microphone for your voice and Include System Audio for the Mac's own sound.
  • One minute of full-screen video easily weighs tens of MB, so export at 1080p or convert to MP4 before you send it.

Screen record on Mac with ⌘ Shift 5

Press ⌘ Shift 5. A toolbar appears at the bottom of the screen. The buttons on the left take still images, and the ones on the right record a video of your screen.

Record Entire Screen
The whole screen. If you have two displays, click the one you want to record.
Record Selected Window
One window. Click the window you want. The rest of the desktop, your notifications and other apps stay out of the frame.
Record Selected Portion
An area. Adjust the rectangle with its handles. It keeps its size from one recording to the next if Remember Last Selection is checked.

Start and stop

Click Record on the right side of the toolbar. With the timer from Options, recording starts after 5 or 10 seconds, enough time to set up what you want to show.

To stop, click the Stop Screen Recording button that appears in the menu bar at the top of the screen. From the keyboard, ⌘ Control Esc does the same thing. Esc on its own, before recording starts, cancels everything.

Where does the video go?

To your desktop, as a .mov file with a name like “Screen Recording 2026-10-29 at 14.05.12”. A thumbnail shows up in the bottom-right corner for a few seconds first. While it's there, the file hasn't been written yet. To use another folder, go to Options and pick one under Save to.

If you need a still image instead of a video, every shortcut is in our guide on how to take a screenshot on Mac.

The recording options worth knowing

The Options menu in the ⌘ Shift 5 toolbar holds everything that changes how the video looks and sounds. Open it before you screen record on Mac for someone else, because sound and click circles can't be added once the file exists.

  • Save to picks where the .mov file lands. A folder in Documents keeps the desktop clear.
  • Timer waits 5 or 10 seconds before recording starts.
  • Microphone records your voice, from the built-in mic, AirPods or a plugged-in microphone.
  • Include System Audio records the sound coming out of the Mac.
  • Show Mouse Clicks draws a circle around the pointer at each click, so viewers can see where you click.
  • Show Mouse Pointer can be unchecked when the pointer would only get in the way.
  • Remember Last Selection brings back the same rectangle for Record Selected Portion.
  • Show Floating Thumbnail controls the preview in the corner after you stop. Uncheck it and the file is written right away.

For a tutorial, a good default is Record Selected Window with Microphone and Show Mouse Clicks turned on. Your voice explains, the circles show where you click, and nothing outside the window gets in.

Get the screen ready before you record

People often watch a screen recording small, in an email or on a phone. Two minutes of preparation make it far easier to follow than any amount of editing.

  • Make the text bigger. Press ⌘ + two or three times in the browser or document you're showing.
  • Silence notifications. Open Control Center, then Focus, and turn on Do Not Disturb for as long as you're recording.
  • Tidy the background. Close tabs and windows that don't belong there, especially ones that show names or amounts.
  • Keep it short. A demo of 1 to 3 minutes gets watched to the end. Anything longer works better split into several videos.

Before you screen record on Mac for real, do one dry run. The second take is almost always the one you keep, and the 5 second timer gives you time to get your hands in place.

Screen record with audio on Mac

This is the question that comes up most, and for good reason. When you screen record on Mac, sound isn't captured by default. You set it in the Options menu of the ⌘ Shift 5 toolbar, before you start.

  • Microphone. Choose the built-in mic, AirPods or a plugged-in microphone. This is your voice, to talk through what you're doing.
  • Include System Audio. The sound coming out of the Mac, from a video, an app or a video call.

The two can be combined. For a demo, check only the microphone, since notification sounds have no place in the video. To keep the music in a presentation, add system audio.

Record your screen with internal audio

What many people call internal audio is the Include System Audio option. With it checked, whatever the Mac plays ends up in the recording, whether that's a video, an app's sounds or the people on a call. Add Microphone on top if you also want to speak over it.

Permission for another app

Recording apps, Eyno Show included, ask for permission the first time you use them. You'll find it in System Settings > Privacy & Security > Screen & System Audio Recording. Turn the app on there, then quit and reopen it.

QuickTime screen recording

QuickTime Player, installed on every Mac, takes you to the same place. File > New Screen Recording opens the ⌘ Shift 5 toolbar. Where QuickTime earns its keep is after you record. It opens the video, shortens it, then exports it at a more reasonable size.

In practice, start with the shortcut when you want to screen record on Mac quickly, and open the file in QuickTime when it needs tidying up. QuickTime also records the screen of an iPhone plugged into the Mac, as shown further down.

Trim the start and the end

The first seconds almost always show the toolbar, and the last ones show the pointer heading for the stop button. There are two ways to remove them without editing software.

From the thumbnail

Click the thumbnail that appears right after you stop, then the trim button. Drag the yellow edges of the strip to the real start and the real end, then confirm.

In QuickTime Player

Open the video, then choose Edit > Trim…. It works the same way, with the yellow edges. Split Clip cuts the video in two at the playhead, which is how you remove a passage from the middle.

Record an iPhone screen on your Mac

For a mobile app, connect the iPhone to the Mac with its cable and unlock it. In QuickTime, choose File > New Movie Recording. Next to the red button, the small arrow opens the list of cameras. Pick the iPhone. Its screen appears live in the window, and the red button starts recording the phone's screen at full resolution.

Taps aren't drawn on screen, so say out loud where you're tapping.

Screen record on MacBook Air and MacBook Pro

To screen record on MacBook Air or MacBook Pro, everything above works the same. The shortcut is still ⌘ Shift 5, with ⌘ on both sides of the space bar, Shift above fn and Control, and 5 on the number row.

The built-in mic also picks up typing and the fan. For a cleaner voice, AirPods or a headset mic make a real difference, and you choose them from the same Microphone list.

On a Retina laptop screen, recording everything also gives you the heaviest files. Record Selected Window keeps the video smaller from the start.

Make the video lighter and share it

When you screen record on Mac, the video is captured at your screen's resolution. On a Retina display, 1 minute of full-screen video easily weighs tens of MB, more than the 25 MB Gmail accepts as an attachment.

  • Record a smaller area. A window or a portion rather than the entire screen.
  • Export at 1080p. In QuickTime, choose File > Export As, then 1080p or 720p.
  • Convert to MP4. A .mov file doesn't open everywhere. Eyno Convert turns the video into an MP4, makes it lighter to send and can trim it too.

For anything longer than a few minutes, a share link from iCloud Drive or another storage service keeps your recipient's inbox from choking on it.

Eyno Show · video demos

A polished demo with Eyno Show

The Mac's tool records the screen exactly as it is. To present a product or train a client, you're missing what an editor would add afterward: zooms on what matters, a background, a clean voice and subtitles. Eyno Show records your Mac screen and prepares that edit while you record.

  1. RecordThe entire screen, a window, an area or the screen of a connected iPhone, with the camera and microphone if you want them. ⌥ Shift ⌘ R starts a recording from any app.
  2. PolishZooms follow your clicks, the pointer is smoothed, and the window sits on a background. Everything can be adjusted afterward, tab by tab.
  3. ExportAs MP4 from 720p to 4K, as a GIF, or with a preset for YouTube, LinkedIn or X, in horizontal, vertical or square format.
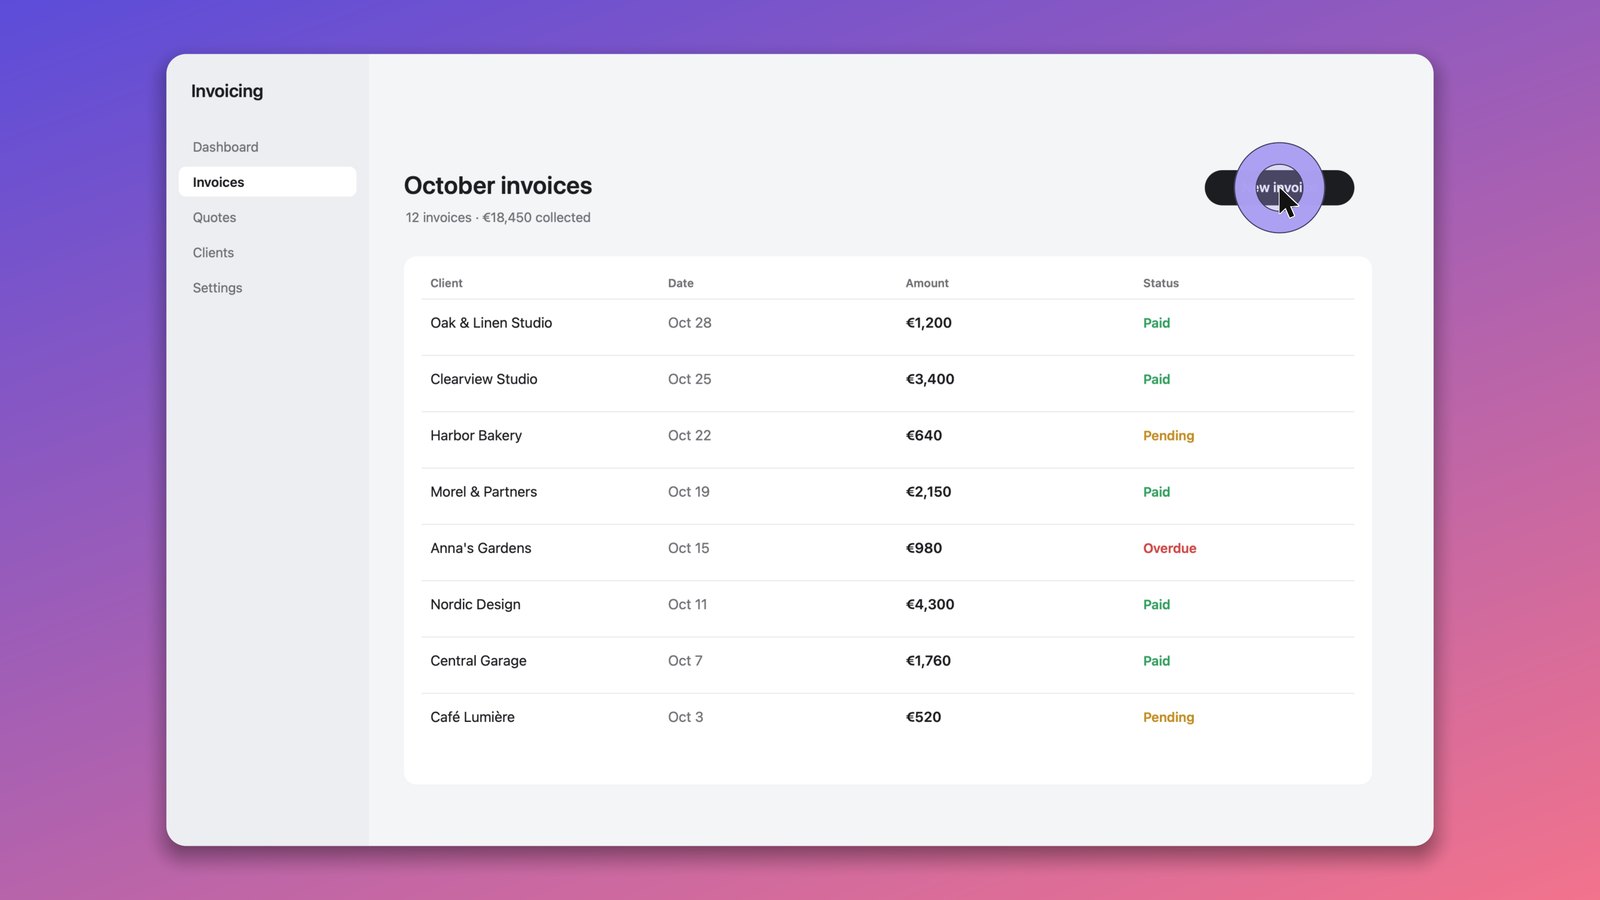
Frame from a demo exported by Eyno Show: the window of a fictitious invoicing app showing an October invoices table, set on a purple to pink gradient background, with a circle marking the click on the New invoice button.
One frame of the video as Eyno Show renders it, from a fictitious demo. The window has rounded corners and a shadow, sits on a background, and the click is highlighted.

On the audio side, Show isolates your voice from room noise, levels the volume and shortens silences. Subtitles are transcribed on the Mac itself, without uploading the video to a server, then translated if needed and exported as SRT or VTT for YouTube.

It also adds intro and outro title cards with your logo, and annotations such as arrows, boxes, numbered steps and blurred areas. The keyboard shortcuts you press can appear on screen, while ordinary typing stays hidden by default.

Questions

When things go wrong

How can I record my screen with internal audio on my MacBook?

Press ⌘ Shift 5, open Options and check Include System Audio before you start. That captures the sound coming out of the Mac. Check Microphone as well if you want your voice on top. Without either, a screen recording on Mac is silent.

Why can't I find screen recording in my Control Center?

You don't need Control Center to record your screen. Press ⌘ Shift 5 from any app, open the Screenshot app in Applications > Utilities, or choose File > New Screen Recording in QuickTime Player. All three open the same toolbar.

Can you screen record a FaceTime call?

Include System Audio covers the sound of a video call, so the usual settings apply. Choose Record Selected Window on the call, check Microphone for your voice and Include System Audio for the other person. Let everyone on the call know you're recording before you start.

How long can a screen recording last?

The Mac doesn't set a maximum length. The recording keeps going as long as there's space left on the disk. For a long full-screen session, check your free space before you start.

Why is part of my video black?

Protected movies, like the ones on Netflix or in the TV app, are blacked out by the Mac in every recording. The rest of the screen is recorded normally.

Next steps

To show a bug to a coworker, ⌘ Shift 5 and a minute of video are enough. To present a product, train a client or publish a tutorial, Eyno Show saves you the editing time. The zooms on your clicks and the background are in place as soon as you stop recording, and subtitles are transcribed on the Mac. The 7-day trial needs no card and opens the seven other apps too, and the Eyno subscription costs €5.99 a month or €59.90 a year for all eight. You can first try Show in the demo Mac on the home page without installing anything.