How to Screenshot on Mac

To take a screenshot on Mac, press ⌘ Shift 3 for the whole screen or ⌘ Shift 4 for an area you drag with the mouse. The image lands on your desktop right away. The rest of this guide covers a single window, screen video, full web pages, where the files go and how to mark them up before you send them.

Updated October 29, 2026 · Verified on macOS 27 · 10 min read

Key takeaways

  • ⌘ Shift 3 captures the whole screen, ⌘ Shift 4 an area, and pressing Space right after switches to a whole window.
  • Adding Control to any of these shortcuts copies the image instead of saving a file, ready to paste with ⌘ V.
  • ⌘ Shift 5 opens a toolbar that can also record video, with a 5 or 10 second timer and a choice of folder.
  • Screenshots are saved to the desktop as PNG files. The Mac can't capture a page that scrolls, but Safari's Export as PDF gets you the whole page.

Every Mac screenshot shortcut

They work on every Mac, with nothing to install. Each way to take a screenshot on Mac starts with the same two keys. ⌘ is the Command key, on both sides of the space bar, and Shift is the key marked with an upward arrow, ⇧.

⌘Shift3
The whole screen. With two displays connected, you get one image per display.
⌘Shift4
An area. The pointer turns into crosshairs with its coordinates. Drag a rectangle, and the screenshot is taken when you let go.
⌘Shift4 then Space
A window. The pointer turns into a camera, the window under it lights up, and one click captures it with its shadow.
⌘Shift5
The screenshot toolbar. Screen, window or selection, as a still image or a video, with options.
⌘Shift6
The Touch Bar, on MacBook Pro models that have one.
Esc
Cancel a screenshot you've started, without saving anything.

Moves while you drag

Once you've started an area with ⌘ Shift 4, keep the mouse button held down. Space moves the whole rectangle without changing its size, which helps when you started a little too high. Shift locks one side, so the area only grows in width or in height. Option grows the area from its center.

In window mode, hold Option as you click to get the image without the gray shadow around it.

Copy instead of saving

Add Control to any shortcut. ⌘ Control Shift 4 puts the area on the clipboard without creating a file. Then paste it into an email, a chat or a document with ⌘ V.

This is the fastest way to show someone something, with less than 5 seconds between the keys and the sent message. Your desktop also stops filling up with files you'll delete later.

The ⌘ Shift 5 toolbar for screenshots and video

A toolbar appears at the bottom of the screen. The three buttons on the left take still images of the entire screen, the selected window or a selection, which macOS calls Capture Selected Portion. The three on the right do the same in video: Record Entire Screen, Record Selected Window and Record Selected Portion. On macOS 27, one more button sends your selection to Apple's Visual Intelligence.

The Options menu handles the rest.

  • Save to Desktop, Documents, Clipboard, Mail, Messages, Preview or Other Location….
  • Timer of 5 or 10 seconds, enough to open a menu or put the pointer where you want it.
  • Microphone and, for video, Include System Audio, which is the sound coming out of the Mac.
  • Show Floating Thumbnail, Remember Last Selection, Show Mouse Pointer and, for video, Show Mouse Clicks.

macOS 27 also captures in HDR. That setting lives in the same Options menu.

Remember Last Selection is worth turning on if you capture the same part of the screen again and again, such as a chart you check every morning. The rectangle comes back the next time you open the toolbar, so you only click instead of redrawing it.

Record your Mac screen as a video

Choose the entire screen, a window or a portion, then click Record. To stop, click the stop button that appears in the menu bar, or press ⌘ Control Esc. The video lands on your desktop as a .mov file named “Screen Recording” followed by the date and time.

By default, the recording has no sound. Check Microphone in Options for your voice and Include System Audio for the sound of a video or an app. You can turn on both, which is useful when you talk through a demo while it plays.

Sound, trimming, file size and the usual snags are covered in our guide on how to screen record on Mac with audio.

To present a product on video, clean and without editing, Eyno Show records video demos ready to share.

Which shortcut for which job

Most people end up using two or three of these every day. A few habits save real time.

  • Reporting a bug. Press ⌘ Control Shift 4 around the error message, then ⌘ V in the email to support. No file to clean up afterward.
  • Keeping a receipt or a confirmation page. Press ⌘ Shift 4, then Space, and click the browser window. You get the window alone, saved with the date in its name.
  • Showing everything at once, like a layout spread across two displays. ⌘ Shift 3 gives you one image per display.
  • Catching a tooltip. Open ⌘ Shift 5, set the timer to 10 seconds, start, then hover over the button before the countdown ends.

If you only remember one shortcut, make it ⌘ Shift 4. It covers an area, a window with Space, and the clipboard with Control.

Where do screenshots go on Mac?

To your desktop, as PNG files, with names like “Screenshot 2026-10-29 at 14.05.12”. The name follows the date and time, so your screenshots line up in order on their own.

Right after you take one, a thumbnail stays in the bottom-right corner of the screen for a few seconds. While it's there, the file hasn't been written yet. Click it to open it, drag it straight into a message or a folder, or swipe it to the right to save it immediately.

To use another folder, press ⌘ Shift 5, open Options and pick a place under Save to. A “Screenshots” folder inside Documents keeps your desktop from overflowing after a week. Choose Other Location… to point to it.

Picking Clipboard in that list makes every screenshot on Mac behave as if you had added Control. Nothing is saved, and everything is ready to paste. Preview sends each new screenshot straight to Preview.

Find an old screenshot on Mac

They all start with the same name. Press ⌘ Space and type the start of the name followed by a date, for example “Screenshot 2026-10”, to list the ones from October. In Finder, the same search sorted by date created brings up the newest first.

Screenshot on MacBook Air and MacBook Pro

The shortcuts are the same on a MacBook Air and a MacBook Pro. On the keyboard, ⌘ sits on both sides of the space bar, Shift just above fn and Control, and the numbers 3, 4 and 5 on the top row of keys.

On a Windows keyboard plugged into a Mac, the Windows key acts as ⌘. MacBook Pro models with a Touch Bar get one extra shortcut, ⌘ Shift 6, which captures the bar itself.

On a laptop screen, a full-screen capture often shows more than the other person needs. Taking a screenshot on MacBook with ⌘ Shift 4 around the part that matters gives them less to search through, and a smaller file.

How to screenshot a full page on Mac

There's no scrolling screenshot on Mac. The system captures what's visible and nothing more. For a complete web page, Safari has a simple workaround. Open the page, then choose File > Export as PDF…. You get a PDF of the whole page that you can send as is or open in Preview.

For a long chat or document, the safest route is still several area screenshots that overlap a little, sent in order. Number them in the file names if the person on the other end needs to read them in sequence.

How to screenshot on Mac without the keyboard

Shortcuts are the quickest way, but you don't have to memorize them. Two routes work with the mouse alone.

With Preview

Preview can take a screenshot that opens right inside it, ready to crop or export. Choose File > Take Screenshot, then From Selection…, From Window… or From Entire Screen.

With the Screenshot app

The Screenshot app, in Applications > Utilities, opens the same toolbar as ⌘ Shift 5. The easiest way to find it is ⌘ Space, type “Screenshot”, then Return. Keep it in the Dock afterward and it's one click away.

Its 10 second timer gives you time to open a menu or hover over a button until its tooltip shows, two things you can't capture while your hands are on the keyboard.

Mark up a screenshot before you send it

Clicking the thumbnail opens the Mac's own markup tools, with shapes, text, a signature and cropping. For an arrow or a word on top of the image, that's enough.

It gets harder when you need to hide an email address, blur a card number or number the steps of a how-to. You open the image in another app, save it, find it again, then attach it. For a screenshot you send ten times a day to support or a coworker, those detours add up.

Eyno Draw · screenshots and drawing

A shortcut that opens the tools right away

Eyno Draw adds its own shortcut, ⌘ Shift 2, which works even when the app is closed. The Mac's own shortcuts stay as they are.

  1. ⌘ Shift 2The screen freezes. Drag an area, press Space to take the window under the pointer, which lights up with its name, or click once for the whole screen.
  2. Mark upArrow, box, ellipse, line, text, highlighter, step number, stamp, brush, blur or pixels, in the window that opens.
  3. CopyPaste the screenshot into your message. Anything you blurred stays blurred in the copied image.
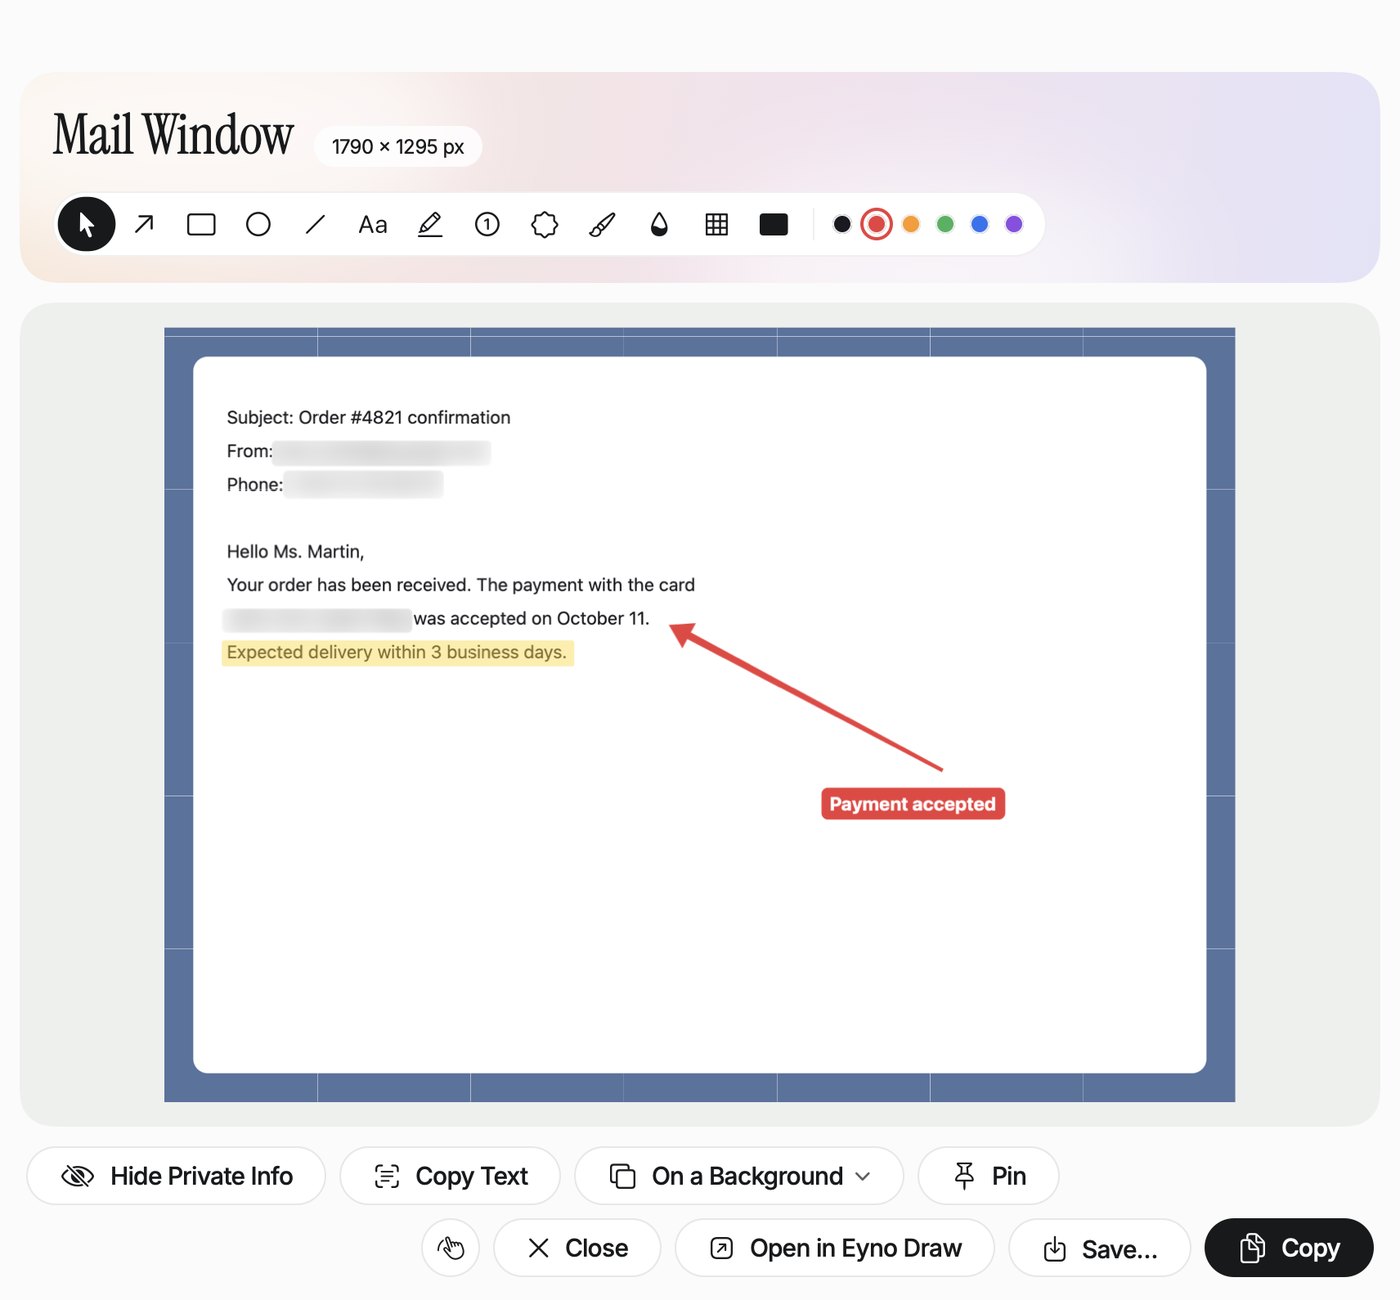
Eyno Draw's capture window, titled Mail Window, over an Order #4821 confirmation email. One line is highlighted in yellow, a red arrow points to the payment date with a red label reading Payment accepted, and the email address, phone number and card number are blurred.
The window that opens after the capture. Hide Private Info blurred the email address, phone number and card number in one click, and Copy sends the image to the clipboard.

Hide Private Info finds email addresses, phone numbers and card numbers in the screenshot and hides them all at once. Copy Text reads the text in the image, handy for pasting an error message into a search. Pin keeps the screenshot above your windows while you copy something from it. On a Background, Save… and Open in Eyno Draw sit in the same row.

From the menu bar icon, you can also choose Capture in 3 Seconds or Capture in 5 Seconds, Capture Last Area Again or open Recent Screenshots. Eyno Draw doesn't take scrolling screenshots, and neither does the Mac.

Change the shortcuts or the file format

Change a Mac screenshot shortcut

Open System Settings > Keyboard, click Keyboard Shortcuts… and go to Screenshots. Each shortcut can be turned off or replaced. Double-click the key combination, then press the new one.

This is also the place to look when a shortcut stops working, since another app may have claimed the same keys.

Switch to JPG

The Mac saves PNG files, which are sharp but heavy. A full-screen screenshot on Mac often weighs more than 2 MB. To switch to JPG, open Terminal, type defaults write com.apple.screencapture type jpg and press Return. Replace jpg with png to switch back.

To convert a screenshot you've already taken without opening Terminal, Eyno Convert turns your PNG screenshots into JPG files.

Questions

When things go wrong

How do I take a screenshot on my laptop?

If your laptop is a MacBook Air or a MacBook Pro, press ⌘ Shift 3 to capture the whole screen, or ⌘ Shift 4 and drag around the part you want. The image is saved to your desktop as a PNG. Add Control to either shortcut to copy it instead, ready to paste with ⌘ V.

Why is my screenshot black?

Protected videos, like the ones on Netflix or in the TV app, are blacked out by the Mac itself in every screenshot. The rest of the screen is captured normally. Pausing the video doesn't help, and the area stays black.

Why does nothing happen when I press the keys?

Open System Settings, then Keyboard, Keyboard Shortcuts and Screenshots, and check that the shortcuts are turned on. If one of them is grayed out or changed, another app may have taken the same key combination.

Why doesn't my screenshot show up on the desktop right away?

As long as the thumbnail is showing in the bottom-right corner, the file hasn't been saved yet. Wait for it to disappear, swipe it to the right, or uncheck Show Floating Thumbnail in the ⌘ Shift 5 options.

How do I take a screenshot of an open menu?

Open the menu, then press ⌘ Shift 4. The screenshot is taken over it. Press Space next and you can capture the menu on its own, without the rest of the screen.

Where to go from here

With ⌘ Shift 4 and Control, a screenshot on Mac is sent in two seconds most of the time. If you often send them with details to hide or steps to number, try Eyno Draw for 7 days, no card needed. The trial also opens the seven other apps in the suite, and the Eyno subscription costs €5.99 a month or €59.90 a year for all eight. You can first try the apps in the demo Mac on the home page without installing anything.